Welding symbols chart: what every part of the symbol means
A welding symbol on a blueprint or shop drawing packs a whole weld into one small mark: which joint, which side, what type of weld, how big, and how the face is finished. This chart puts every piece on one page in our own drawings, with a one-line meaning for each, so you can look a symbol up in seconds and then learn it for good. Print it for the shop or your study desk with Ctrl+P (Cmd+P on a Mac): the print view drops the sidebar and keeps the drawings.
Check anything you rely on against your own licensed code book and the edition your AHJ enforces.
The symbol system comes from AWS A2.4, the American Welding Society standard for welding, brazing and NDE symbols. Every drawing and sentence on this page is ours; the standard's own figures stay in the standard. When you want the step-by-step reading order with clause pointers, use how to read welding symbols on drawings. When you want to drill, the welding symbols quiz shows you a symbol and scores every answer.
Anatomy of a welding symbol
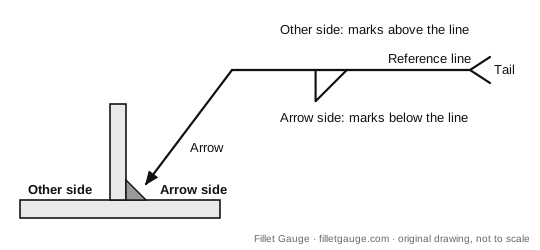
Use this diagram
- Arrow: points at the joint the symbol is for, and only that joint.
- Reference line: the horizontal line the arrow joins. Every weld symbol and number hangs on it.
- Tail: the fork at the far end. It holds the process, a WPS number, a specification or a note. Leave it off when there's nothing to say.
- Weld symbol: the small shape that names the weld type, such as the fillet triangle. The welding symbol is the whole assembly.
- Arrow side and other side: marks below the line apply to the side of the joint the arrow touches. Marks above the line apply to the opposite side. That holds whichever way the arrow points.
The rule people trip on: "arrow side" is the side of the joint, not the near side of the drawing. Settle the side first, then read everything else.
Try one question
Question 1 of the free 10-question check on CWI Part A. No signup. Then ask Tack, the AI study buddy, why the answer is right and the others are wrong.
Symbols - Welding and NDE
On a welding symbol, what does a circle at the junction of the arrow and the reference line indicate?
Press A–D or 1–4 to choose an answer while this question is on screen.
Choose an answer to begin
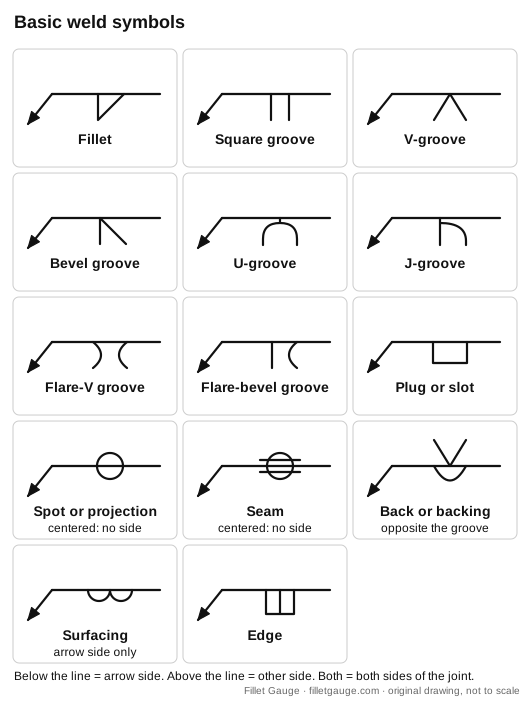
Basic weld symbols chart
Use this diagram
| Symbol | What it looks like | What it calls for |
|---|---|---|
| Fillet | A right triangle, upright leg on the left | A fillet weld in the corner of a T, lap or corner joint |
| Square groove | Two parallel strokes | A groove weld between square edges, no bevel |
| V-groove | A V | A groove with both members beveled |
| Bevel groove | One upright stroke, one sloping stroke | A groove with one member beveled; a break in the arrow points at the member that gets the bevel |
| U-groove | A rounded bowl | Both members get a curved preparation |
| J-groove | One upright stroke, one curved stroke | One member gets a curved preparation; an arrow break works as for the bevel |
| Flare-V groove | Two curves bulging toward each other | A groove between two rounded surfaces, such as two bars or bent edges side by side |
| Flare-bevel groove | One upright stroke, one curve | A groove between a rounded surface and a flat one, such as a bar or tube on a plate |
| Plug or slot | A rectangle | A weld through a round hole (plug) or an elongated hole (slot) in one member; the dimensions and the drawing tell you which |
| Spot or projection | A circle | Spot welds, usually resistance welds between overlapping sheets |
| Seam | A circle crossed by two lines | A continuous weld along overlapping members |
| Back or backing | An open half-circle, opposite the groove symbol | A weld on the far side of a groove weld: a back weld goes in after the groove weld, a backing weld before it, and the drawing or a note says which |
| Surfacing | Two small arcs side by side | Weld metal built up on a surface instead of joining parts; drawn on the arrow side only |
| Edge | Three strokes joined at their outer ends | A weld along the edges of members laid together, common on sheet and flanged parts |
The upright leg of the fillet, bevel and J shapes always sits on the left, wherever the joint is. A2.4 also has symbols for stud welds and for brazing, which turn up less often on structural shop drawings.
Ask Tack before you buy AI your Fillet Gauge study buddy
See what's on the CWI Part A exam, test yourself with 5 quick questions, or find the plan that fits you.
The CWI Part A course
Available now · instant accessLearn every Part A topic, then prove it on timed practice exams.
- 10modules of lessonsEvery task on the outline
- 2full-length timed exams165 questions in 135 minutes each
- 704practice questionsEach one explained
- 5worked calculationsStep by step
- 1week-by-week study planSet to your exam date
Turn a practice answer into a study step. In untimed practice, ask Tack AI about any question you answer, follow up, then see your weakest topics and what to drill next.
Instant access. Terms and refunds · Secure checkout by Stripe · Billed by Nori Software
- Full CWI prep$249$48 less than buying the 3 courses separatelyIncludes the CWI Part A, CWI Part B and CWI Part C D1.1 courses
Terms and refunds · Secure checkout by Stripe · Billed by Nori Software
- Free sample lessonFree
- Question of the dayFree
Every answer comes with a full explanation.
Supplementary symbols
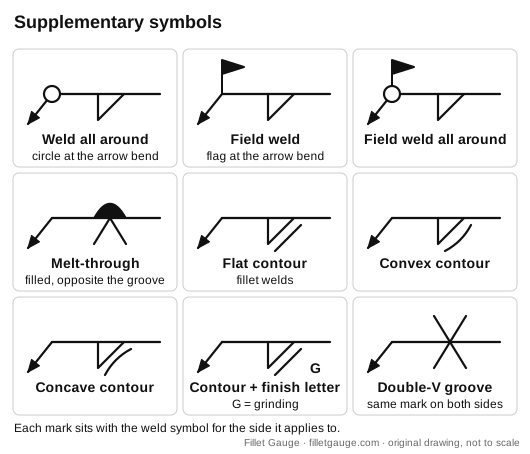
Use this diagram
| Mark | Where it sits | What it means |
|---|---|---|
| Weld all around | A circle at the bend where the arrow meets the reference line | The weld continues around the whole joint, such as a tube or a stiffener welded on every side |
| Field weld | A flag at the same bend | The weld is made at the job site during erection, not in the shop |
| Melt-through | A filled half-circle, opposite the groove symbol | A weld made from one side that must show visible root reinforcement on the far side |
| Flat, convex or concave contour | A short line drawn on the weld symbol's face, straight, bulging out or dished in | The shape the finished weld face must have; the flat mark is for fillet welds, and groove, plug and slot welds use the flush mark |
| Finish letter | Beyond the contour mark | How the contour is reached, such as G for grinding; with no letter, any suitable method can be used |
| Backing, spacer, consumable insert | With the groove symbol | Material placed at the root of a groove weld; A2.4 Clause 7 covers each mark |
A weld symbol on both sides of the line, like the double-V in the last box, calls for welds on both sides of that one joint. It doesn't cover other joints on the same part.
One symbol at a time
Each of these pages takes one symbol, draws it beside the joint it describes, and covers how to read it and the mix-ups that trip people.
| Symbol | In one line | Full page |
|---|---|---|
| Fillet | A triangle: a fillet weld, size on the left | Fillet weld symbol |
| Weld all around | A circle at the arrow bend: the weld goes around the whole joint | Weld all around symbol |
| Field weld | A flag at the arrow bend: made at the job site | Field weld symbol |
| Stitch (intermittent) | Length-pitch after the symbol, such as 3-10 | Stitch weld symbol |
| V-groove | Both members beveled; root opening inside, angle outside | V-groove weld symbol |
| Bevel groove | One member beveled; the arrow break picks which | Bevel groove weld symbol |
| Plug or slot | A rectangle: a weld that fills a hole in one member | Plug and slot weld symbol |
| Spot | A circle on the line: welds at points between overlapping members | Spot weld symbol |
| Back or backing | An open half-circle opposite the groove | Back weld and backing weld symbol |
| Contour | Flat, convex or concave face, plus a finish letter | Weld contour symbols |
| Square groove | Two strokes: square edges, root opening between them | Square groove weld symbol |
| U-groove | A bowl on a stem; radius and root face come from a detail | U-groove weld symbol |
| J-groove | One member gets a curved prep; the arrow break picks it | J-groove weld symbol |
| Double-V | A V on each side of the line, each with its own numbers | Double-V groove weld symbol |
| Flare-V | Two curves facing each other: two rounded members | Flare-V groove weld symbol |
| Flare-bevel | Upright stroke and a curve: round meets flat | Flare-bevel groove weld symbol |
| Edge | Three joined strokes; size is depth of fusion | Edge weld symbol |
| Surfacing | Two arcs, arrow side only; thickness on the left | Surfacing weld symbol |
| Seam | A circle with two lines: a continuous weld along the overlap | Seam weld symbol |
| Melt-through | A filled half-circle: root reinforcement from one weld | Melt-through symbol |
For the joint and weld words these symbols point at, such as butt and T-joints, toes, throats and root openings, see the welding terms glossary.
Where the dimensions go
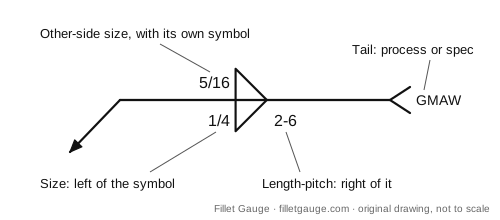
Use this diagram
Use this diagram
| Dimension | Where it sits | Example from the drawings |
|---|---|---|
| Fillet size | Left of the fillet triangle | 1/4 |
| Weld length | Right of the weld symbol | A single number, such as 6 |
| Length and pitch | Right of the symbol: segment length, a hyphen, then the center-to-center spacing | 2-6 means 2-long segments spaced 6 apart, center to center |
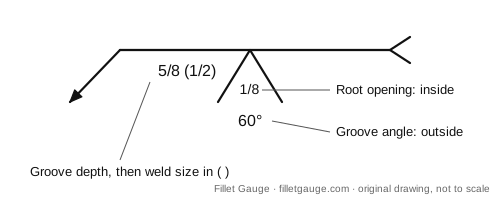
| Groove depth and weld size | Left of the groove symbol, with the weld size in parentheses | 5/8 (1/2): prepared 5/8 deep, weld size 1/2 |
| Root opening | Inside the groove symbol | 1/8 |
| Groove angle | Outside the groove symbol, beyond its open end | 60° |
| Process or specification | In the tail | GMAW |
Three rules keep you out of trouble:
- Numbers belong to the symbol they sit beside. Two different fillet sizes, one above and one below, mean an unequal fillet on each side of the same joint.
- A2.4 doesn't set units. The drawing does, so check the title block before you read 1/4 as inches.
- The symbol says what to weld, not whether it's acceptable. Acceptance comes from the governing code or contract.
The fillet weld calculator turns a fillet size from a symbol into its throat, so you can check the numbers you just read. For the fillet modifiers in depth (weld all around, field weld, length-pitch stitch patterns, chain versus staggered and both-sides fillets), see fillet weld symbols explained.
Three worked symbols
Use this diagram
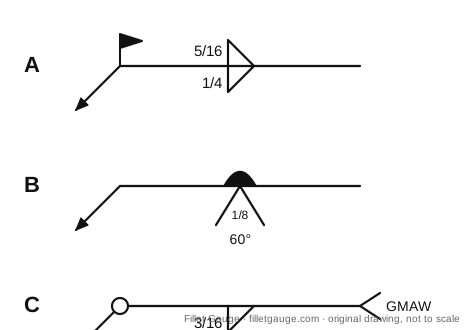
A. A flag at the bend, a fillet below the line marked 1/4 and a fillet above it marked 5/16. Reading: a 1/4 fillet on the arrow side and a 5/16 fillet on the other side of this one joint, both made in the field.
B. A V-groove below the line with 1/8 inside it and 60° beyond it, and a filled half-circle above the line. Reading: a V-groove welded from the arrow side with a 1/8 root opening and a 60° groove angle. The melt-through mark asks for visible root reinforcement on the other side.
C. A circle at the bend, a fillet below the line marked 3/16, and GMAW in the tail. Reading: a 3/16 fillet all the way around the joint on the arrow side, made with gas metal arc welding.
Got all three? Good. If one tripped you, rebuild it in the welding symbol builder: pick the weld, side, size and marks, and it draws the symbol and reads it back in plain words.
Welding symbols on the CWI exam
Symbols carry real weight on the CWI exam. Symbols, Welding and NDE is at least 10% of Part A, and Part A is closed book, so you read every symbol from memory. The Part A guide covers that exam's other domains.
Drawings come back on Part B, where Utilization of Specifications and Drawings is at least 8% of the practical exam. The Part B guide covers the exhibits booklet and how to time the practical.
Practice until it's automatic
- Take any drawing, cover the numbers, and say the side and weld type for every symbol out loud.
- Uncover the numbers and say what each one controls.
- Score yourself on the welding symbols quiz. It also has a one-page chart to print if you want the shapes alone on a single sheet.
- Work backwards in the welding symbol builder until you can predict every drawing before it appears.
- Move on to what the finished weld can get wrong with the weld discontinuity quiz, and fit symbols into your weeks with the CWI study plan.
FAQ
What do welding symbols mean?
Each welding symbol is a complete weld instruction. The weld symbol's shape names the weld type, its place above or below the reference line names the side of the joint, the numbers give size, length and spacing, a circle or flag at the arrow bend calls for weld all around or a field weld, and the tail carries the process or a note. The tables above give a one-line meaning for every shape and mark.
How do you read welding symbols on blueprints and drawings?
Follow the arrow to the joint, then decide the side: marks below the reference line go on the side the arrow touches, marks above go on the other side. Next name the weld type, read the numbers beside it, then the marks at the bend and the tail. Check the title block for units. The step-by-step guide walks a full drawing in that order.
Is there a welding symbols chart PDF?
Yes: save this page as one. Press Ctrl+P (Cmd+P on a Mac) and choose Save as PDF as the printer. The print view drops the sidebar and keeps every drawing and table. For the shapes alone on one sheet, use the printable chart on the welding symbols quiz.
Is this an AWS chart?
No. The drawings and wording are ours. AWS A2.4 is the standard behind the symbol system, and AWS sells its own wall and desk charts.
What does the flag on a welding symbol mean?
A field weld: the weld is made at the job site, not in the shop.
What does the circle where the arrow meets the line mean?
Weld all around: the weld continues around the whole joint.
Which side is the arrow side?
The side of the joint the arrow touches. Marks below the reference line go there; marks above it go on the opposite side.
Why is the triangle's upright leg always on the left?
It's a drawing convention for the fillet, bevel and J shapes. It doesn't tell you which plate gets the weld; the arrow does.
Do ISO drawings use the same symbols?
Not exactly. ISO 2553 drawings use their own arrangement, so check which system a drawing names before reading it with this chart.
Know the chart? Prove it on Part A questions
Take the free 10-question check. It's weighted to the Part A outline, scored by domain and needs no signup, so you see whether symbols or another domain is costing you the most points. When you're ready for the full prep, the Part A course gives you a lesson on reading welding and NDE symbols and on every other exam subject, two full-length timed practice exams, and a worked explanation with every answer.
Sources
Show the list
- AWS A2.4:2020, Standard Symbols for Welding, Brazing, and Nondestructive Examination, free sample, American Welding Society: foreword, contents and clause 1. Retrieved 20 Oct 2026.
- AWS bookstore, terminology and symbols listing, American Welding Society. Retrieved 20 Oct 2026.
- CWI Part A Fundamentals Examination Information, American Welding Society, Rev. 03.01.2024. Retrieved 20 Oct 2026.
- AWS B5.1:2025, Specification for the Qualification of Welding Inspectors, American Welding Society, Tables 5.1 and 8.1. Retrieved 20 Oct 2026.
Facts checked 28 October 2026 against the sources listed above. If something has changed, tell us and we will correct it within 2 business days.
Your next step
Ready to see where you stand on CWI Part A?
Free, untimed and scored by domain. No signup.
Start the free 10-question checkPart A course. Lessons, timed practice exams and a plan around your exam date. Get Part A course · $99 See the plans or read the free sample lesson.Terms and refunds
Want a timed run? Try the free 25-question mini-mock. The first 5 need no email.
Prefer paper? Free printables
- Print a class quiz (free PDF). 5 practice questions with an answer key on page 2.
- Print the flashcards as cut-out cards (free PDF). The free flashcard sample, ready to cut and carry.
From the blog
- Fillet weld symbols: all around, field, stitch, both sides
- Weld joint types and positions: 1G, 2F and more
- What Is a Certified Welding Inspector? CWI Job Description